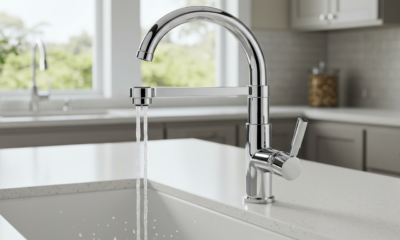
There are few pieces of equipment in your home that get used more than your kitchen sink. That use will undoubtedly take its toll over time for sure. That means on occasion you may find yourself having top replace your sinks faucet for any number of reasons. Although this is something that can be done yourself it is not something that is as simple as it may appear either. In this article, we will explain to you the process required to change the faucet on your kitchen sink.
Why Do Sink Faucets Fail?
There are a number of reasons why your sink’s faucet may someday need to be replaced. We have already mentioned the extreme use they get all the time so natural wear and tear is a big factor. There are also instances where harsh water can cause your faucets internal parts to fail due to the corrosion of metals or the breakdown of plastic or rubber parts that form the seals necessary for your faucet to do its job properly.
Getting Started
Before you can take on this project you must do a couple of things first. You have to gather the essential tools and materials that are necessary to complete the job. Here are some of the tools you will need for this job:
- Adjustable wrench
- Pipe wrench
- Hammer
- Assorted screwdrivers
- Razor knife
- Tube cutter
Next gather these materials:
- New Faucet
- Teflon tape
- Silicone
- Plumbers putty
- Sandpaper
- Tubing
- Shutoff Valves **

Step by Step Faucet Replacement
- Read the installation manual
Always read the installation manual before starting any type of project. The manufacturer always knows best. They will also give you special insight and helpful tasks for making the faucet replacement easier. You are probably thinking why should I read this article then if you are having me read the installation manual? The answer to that is because we will provide you with even more information and helpful tips to make your faucet installation go even smoother.
- Remove the supply lines
Before you start to remove the old faucet you must first shut down the water supply coming to it. There are usually valves under the sink that will do this but not always. You will have to shut down the main water to supply to the house if you do not already have valves installed. Consider adding valves if you don’t have them on the incoming water lines**.
Inspect the supply lines to the faucet itself. Now is a good time to replace them if it needs to be done. If they are metal lines check for such things as corrosion and check plastic lines for signs they are becoming worn or cracked.
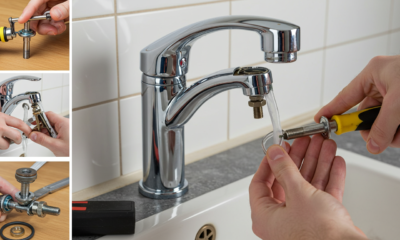
- Remove the old faucet
Before you can install the new faucet you will have to remove the old faucet. Many times this is the most difficult part of the process. You may have corroded parts or parts that are tough to move because of joint sealants. Take your time and be smart here. Removing the old faucet is basically done by reversing the steps we are about to go over here for installing the new faucet. If you have a garbage disposal shut off the breaker and remove it so you will have better access to the faucet area.
- Remove old faucet residue
Ok so now the old faucet is out; hopefully without too much trouble. Now it is time to install the new faucet. There are slight differences in brands but these steps are similar no matter what brand sink you are installing a new faucet on. Clean up the area on the sink basin where the old faucet was attached by lightly sanding the area to remove any sealant residue or corrosion.
- Install the escutcheon cover
The escutcheon cover is used to help make a good seal with the new faucet and to enhance its looks. Add a generous amount of something like an epoxy plumbers putty to the bottom of it to help hold it on and make it watertight.
- Put the new faucet in place
Now you are ready to put the new faucet in place. Make sure that any gaskets that need to be installed are on the bottom of the faucet piece where they belong. It is never a bad idea to add a thin bead of silicone to keep the gasket in place and help make an even better seal. Also before the faucet piece is laid into place add a few wraps of Teflon tape to any threaded pieces on the bottom of it.
Once the faucet is put into place you will then have to attach the parts that go on the underside of the sink basin that is used to secure the faucet to the sink basin.
- Reattach the supply lines
Of course, in order for the new faucet to work, you will then have to reattach the supply lines. As mentioned before you should have replaced the supply lines already if they are not in good condition. Make sure all the connections are tight but be careful not to overtighten anything and break it.
- Wrapping up the job
Now is a great time to remove any sealant residues before they completely harden and become much more difficult to get off. Next turn the water supply back on to the faucet and then thoroughly check all of the connections for leaks. Make sure you take care of even small leaks right away because they can cause damage that becomes a big expensive repair on down the road.
- Use and enjoy
Well there you have it; the satisfaction that you have installed a new faucet on your sink all by yourself. It is not rocket science but you do have to have a little mechanical aptitude and a familiarity with using tools to be able to do it. If you follow the instructions that come with the part and take the advice found here you should have had little trouble replacing your faucet at all.

 100vw, 1000px” data-lazy-src=”https://web.archive.org/web/20230330112642/https://www.faucetmag.com/wp-content/uploads/2017/04/Moen-90-Degree-One-Handle-High-Arc-Pullout-Faucet.jpg” /></p>
<p>Although this is marketed primarily as a pullout kitchen faucet, Moen’s experimentation with marrying what seems like different features (style) is depicted once again in the functionality. You may as well refer to this as a pull-down faucet as well. It has the functionality of Moen’s Reflex Pull-Down system. It’s definitely intuitive and so it’s user-friendly. Something that we concluded from some input from actual consumers and users.</p>
<p>The improved unit features an ultra-flexible hose. It is attached to a spray wand that can be moved around, bent, twisted, and positioned in pretty much any position you’d ever need a hose to move in. Once you have finished using it to access the hardest of dirt-concealing areas of whatever you’re cleaning (grillers, pressure-cookers, etc), the hose very easily returns to the originally docked position. You don’t even have to replace it yourself. It’s just a matter of releasing it and it goes back to a position like something made of memory foam.</p>
<h2><span id=) Maintenance
Maintenance